Gold Stickers
Create your own clear stickers on our awesome clear vinyl sticker material.

Free shipping from Canada
We offer free shipping anywhere in Canada

Fast turnaround
We typically process custom gold stickers and ship orders within 3 Business days.

Cheap Gold stickers
Gold vinyl stickers are a great value and durability transparent stickers.
Gold Custom Stickers!
Made to reflect the potential of your logo and your brand. Here’s why:
- You can stick them on practically anything – water bottles, hockey pucks, camping gear, smartphones, hard hats, laptops, gold stickers for cars – to make a powerful brand statement or showcase your logo or brand with a great metalized mirror like finish!.
- They work wonders on glass and acrylic surfaces when printed on full colour or just print metallic gold sticker with white ink, making them a great option for most surfaces.
- Mirror Gold background stickers, unlike cheap paper stickers, they won’t break, fade, or disintegrate when exposed to the elements, great for a clean sticker application, print your mirror stickers with white ink or just black ink for a great contrast in applications where a fancy, upscaled background is necessary.
- Their strong adhesive allows for repositioning, so you can get that perfect placement every time.
- Made with high-quality metalized polyester vinyl, they boast vibrant and vivid colors that sure catch the eye.
- Clear cote over your customized gold sticker, overlaminate protection, start designing you own gold metallic stickers.
Slap your stickers gold with confidence! they are great for almost any application!
Glossy Gold stickers
Hi Gloss laminate on your Gold Stickers
Sticker Beaver’s hi-gloss laminate is a special finish that we apply to our stickers to give them a shiny and smooth texture, like a hi gloss waxed paint. We do this by adding a clear, high in gloss layer of laminate material to the surface of the shinny gold sticker. This finish not only makes the stickers look cool, but it also adds extra protection and durability.
Die cut gold metallic stickers?
Die cutting involves using a machine to cut out a specific shape from the sticker material. This allows for almost any shape to be cut.
Die cut is ideal for creating specific shapes for creating unique, custom-shaped gold stickers that stand out.
Commonly used shapes like circles, squares, rectangles, triangles, and ovals, are super popular, These shapes are great for simple designs or logos that require a specific shape.
Hi shine gold vinyl, a great gold metallic like option!
If you opt for gold weatherproof sticker material, your design will be printed on a premium metalized gold adhesive vinyl and then coated with a hi shine, weather-resistant laminate. This layer will help your custom metallic stickers last around two to four years outdoors and longer in interiors.

Made in Canada!
Strong adhesive 100% exterior grade customized gold stickers, UV and Scratch resistant protection, white ink gold stickers!
Print gold personalized stickers, gold stickers with logo, gold background stickers and gold label stickers information and F.A.Q.
These are a shiny, mirror-like metallic material made from polyester with pressure-sensitive adhesive. They can be printed with a white ink base, onto which the colours of the design are printed, leaving certain areas translucent (semi-transparent). This allows the parts without the white ink base to blend with the material, producing a metallic bright gold effect in the colour printed on top, giving the colour a metallic appearance.
These stickers are excellent for adding an elegant metallic touch to your design, whether in specific areas or just on the border. They can be used on laptops, windows, bottles, branding (e.g., pouches, cell phones, desks, fridges, motorcycles, bicycles), and in artistic designs with solid colours and polished metal effects. For example, printing a design with a black logo but with some parts appearing metallic/mirror-like sticker.
We place the material in our printer and use software to instruct the printer which parts of the design to print first with white ink and then which parts to print colour on top of the white ink and outside of it. This achieves a solid finish in some areas and a translucent/mirrored effect in others. Once the printing is complete, we add an additional layer called lamination, which is a transparent film that provides extra UV protection, ink protection, and a high-gloss finish. The final stage is die-cutting, followed by packaging and shipping. Our proofing process simulates the solid, mirrored, and combined design elements, as well as the dimensions, shape, and cut.
If your design does not require gold parts or backgrounds that were not part of the original design but you want a multicoloured metallic look, you might want to check out our silver sparkle glitter holographic and holographic options.
Gloss laminate is a cool way to add special finishes to shinny gold, making them look awesome while adding extra protection.
Hi-Gloss laminate is a clear, shiny layer that gives gold stickers a slick and smooth look, like glossy polished paint, this finish is reflective making your design really stand out.
Designs that require an elegant touch combined with a metallic finish
gold stickers with only white ink in combination with a metal background and white elements
Promotional labels that require a luxurious appearance
Logo stickers with black ink and a metallic effect, such as the Mercedes-Benz logo which is black and the background is metallic
It really depends on each particular application but they can last up 5 years indoors!
They can last from 1 to 3 years or more!
Simply indicate the height and width of your stickers, the number of copies, the type of cut (Kiss or Die Cut). Once you upload your file and place your order, our proofing crew will generate a digital proof for you to review and approve when you’re happy with it.
If you already have a design file created in a design program, simply send it to us, preferably as a vector file, but we can work with any image format as long as it has sufficient resolution. We will add the white layer to your file and simulate the brass effect in the proof. If you are a designer or have graphic arts experience, simply add a mask of any colour to your design, rename it “White ink,” place it on the design, save it as a vector in PDF, EPS, PSD, or AI format, and we will make all adjustments on our end. Here is a reference file.
Due to current printing methods and technologies, our white ink has only about 80% opacity, so our stickers will always have a certain degree of transparency. If you need a solid 100%, it’s best to check out our vinyl stickers.
These are not considered microwave or dishwasher safe.
This permanent adhesive offers maximum adherence and it’s designed for maximum durability. The initial contact is moderate, making it easy to reposition if you applied it wrong and want to remove and reapply it at that time. The adhesive will gradually increase its strength over the next few days after application.
At least 15 degrees Celsius is recommended. It’s important to note that they can be refrigerated or frozen as long as they’re applied to a solid, oil-free, dry surface at room temperature.
Since they’re made of polyester, they’re quite durable and great for use with products and daily abrasion. They don’t deteriorate as quickly as paper ones when scratched or exposed to water, moisture, and oils.
We only offer individual gold stickers currently.
Certainly! Certain parts of your gold sticker design can be in gold, silver, white, full colour, or a combination! Additionally, you have the option to request that your design be printed directly onto gold material without any white underlay ink, this will make all the colors in your design 50% translucent and give them a metallic appearance, the drawback is that because white is not present during the printing stage, the opacity of the colour will be reduced by as much as 50%
How to Prepare Your Artwork for Printing
- Choose a file format. We recommend saving your artwork as a PDF.
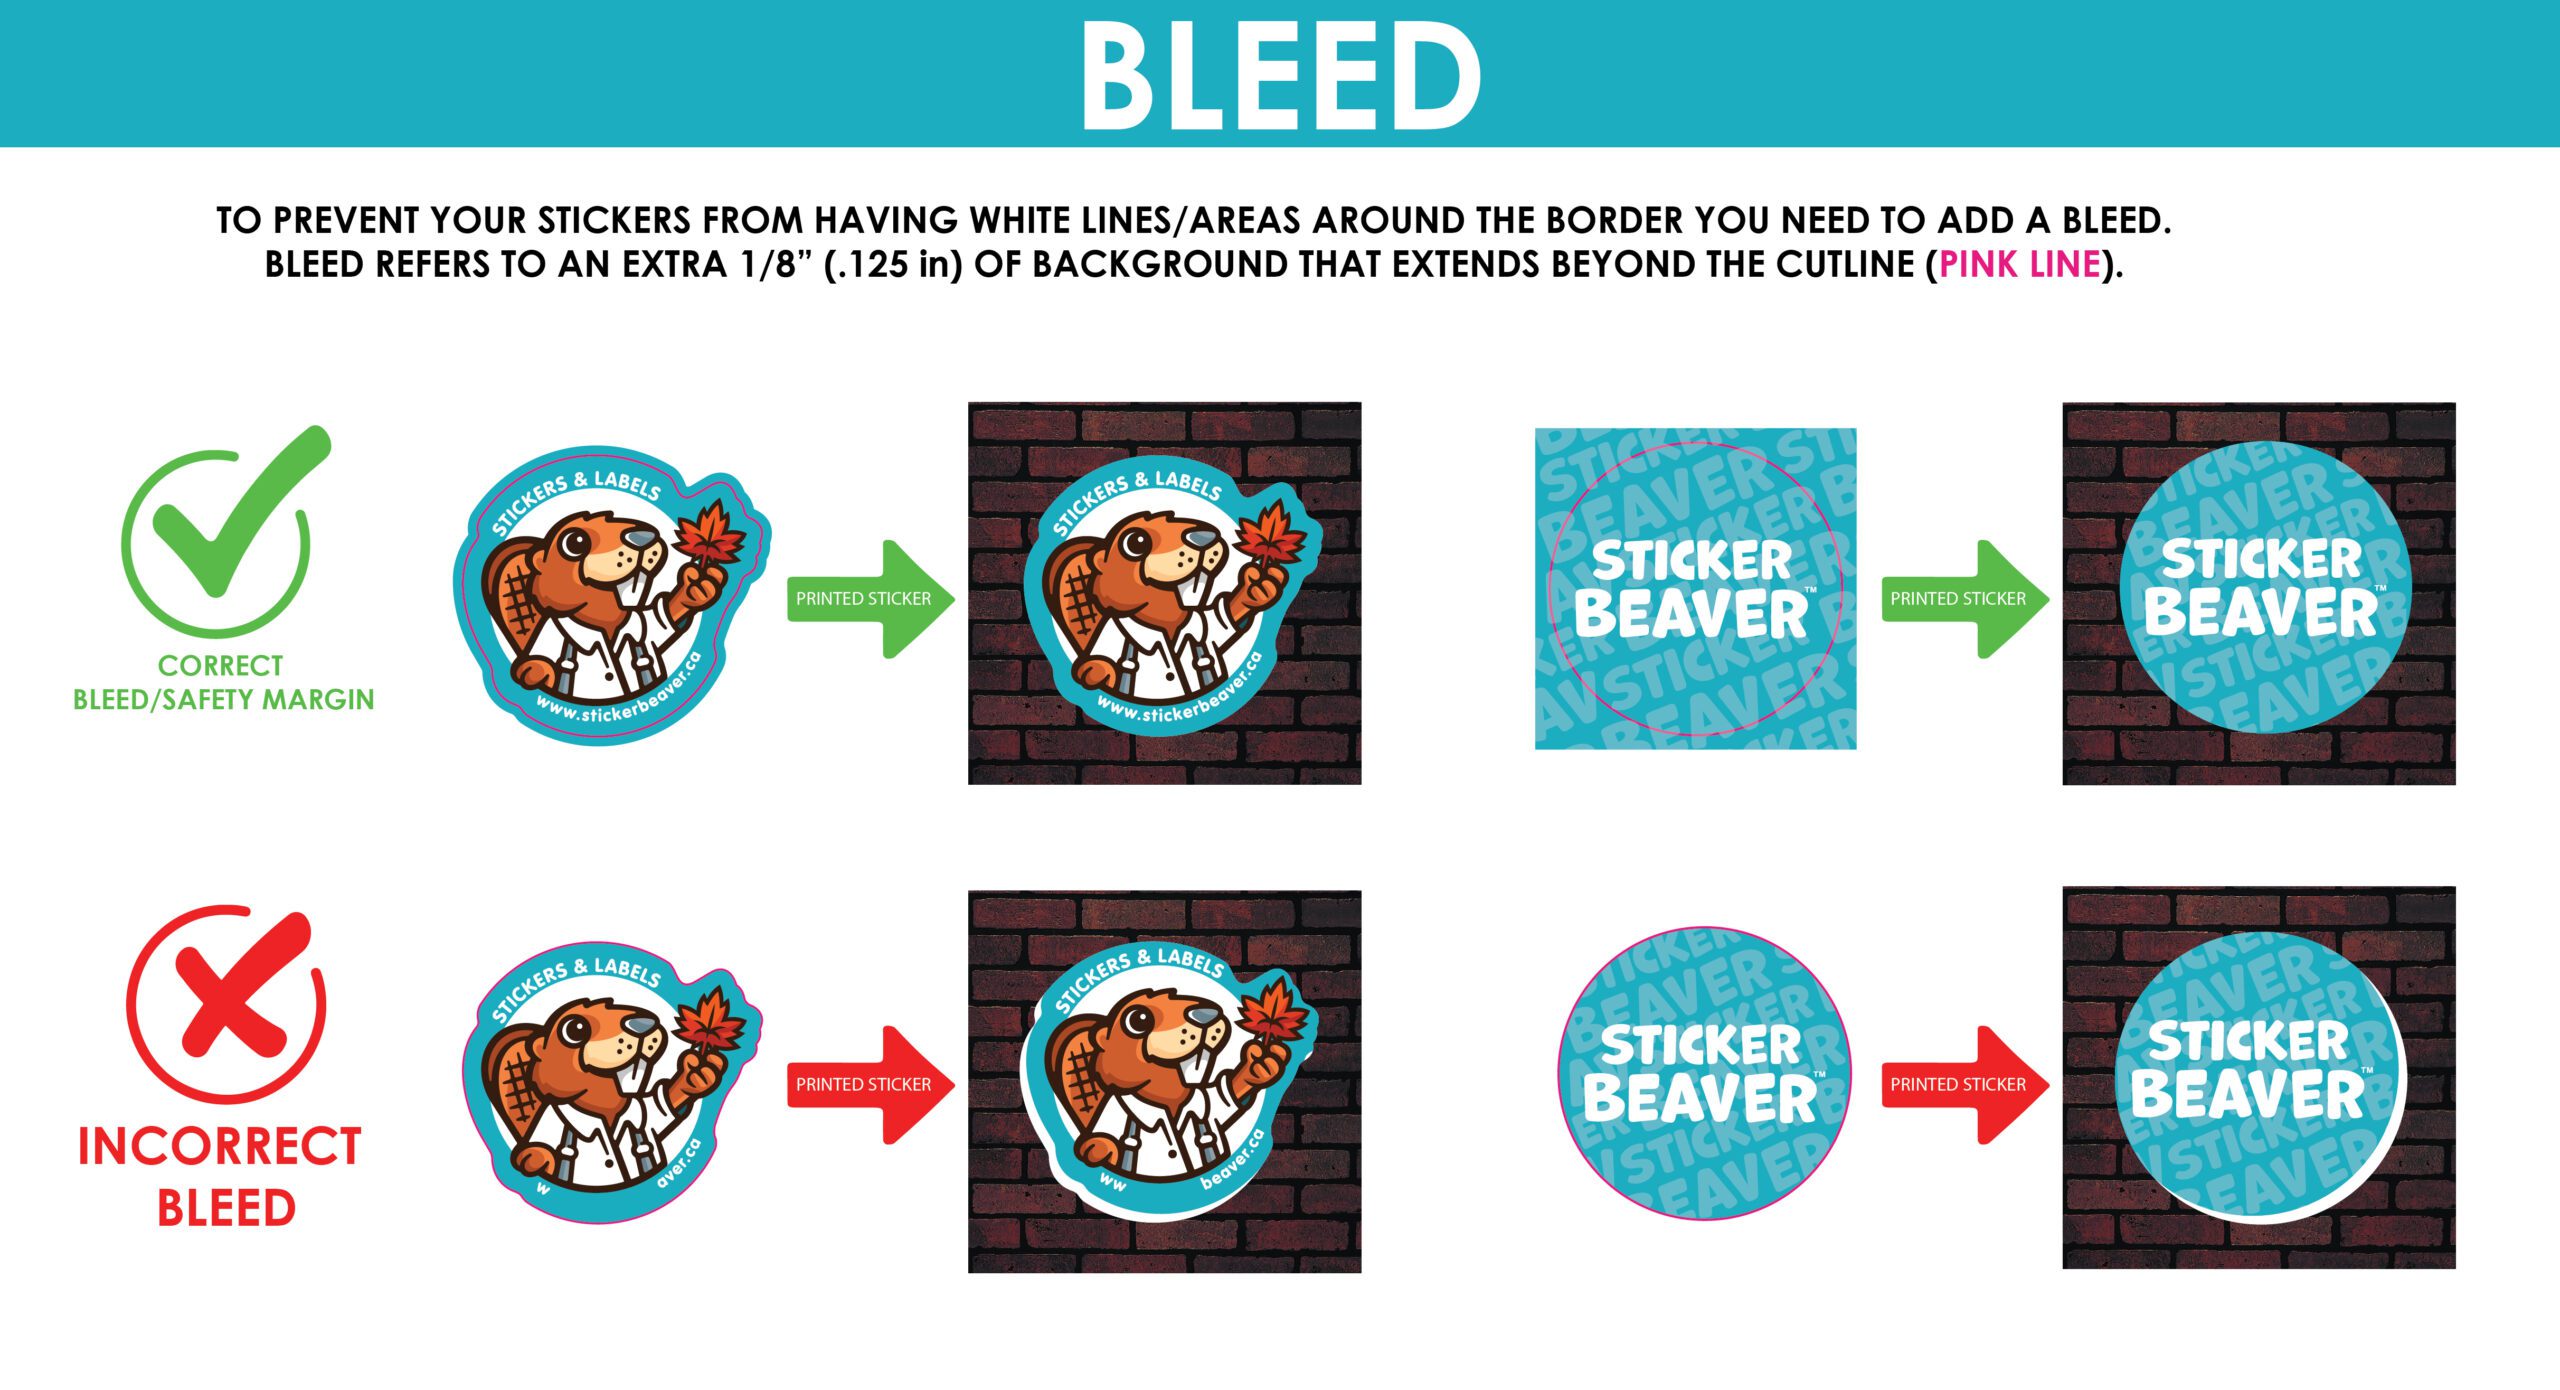
- Add a bleed area. This is only required if you want your artwork to go right to the edge of the vinyl. We suggest a 1/8″ (.125″) bleed area.
- Embed all fonts or convert to vector paths.
- Save your artwork as a single-layered image using the CMYK colour model.
- Make sure the image resolution is at least 300 DPI for best results.
- Ensure your dimensions are at least twice the desired print size.
- Always use the CMYK colour model for printing.
- If you follow these simple steps, your artwork will be ready for printing your amazing stickers!